Manufacturing & Sourcing
How to Prepare Design Files for Clothing Manufacturing
A factory can quote and cut a sample faster when the brief describes the garment, not only the mood. You do not need a finished tech pack to open that conversation.
A sketch, a photo, a garment you already wear, or a short note on fit and fabric is enough to start. The useful part is marking which details are decided and which ones are still open.
This note covers what to send before sampling: a product reference, measurements, fabric, artwork, labels and trims, then quantity, price and timing.
Do You Need a Tech Pack Before Contacting a Clothing Manufacturer?

Not for the first message. A tech pack is a strong way to share measurements, construction, fabric, artwork, trims and packaging. Many first collections begin before those pages exist.
Development at Jnwear can start from any of these:
- A hand sketch or a digital drawing
- Photos of a reference style
- A garment you can ship as a sample
- A mood board
- Fabric swatches
- A few key measurements
- A logo file
- Notes on the fit you want
Say which parts of a reference should be followed. A photo of an oversized hoodie might be about the hood, the wash, the pocket, or only the general shape. If that is not written down, the pattern room has to guess.
A Tech Pack Helps Reduce Guesswork — It Does Not Replace Communication
A detailed pack still needs a conversation. Fabric stretch, a print method, a wash, or a trim that is hard to source can change the sample. The pack is a shared record. It does not replace the questions that come up while the style is being made.
1. Start With a Clear Product Reference
A reference gives the development team a starting garment. It can be a sketch, a photo, a sample you own, or a mix of those. Send the picture and a line that says what to copy.
For a hoodie, that line might cover:
- Silhouette
- Body and sleeve proportion
- Hood shape
- Fabric look
- Wash
- Rib
- Print or embroidery position
- Colorway
- A seam or construction detail
One photo holds many choices. If you want the fit and a different cloth, write that. If you want the wash and a different body, write that too.
Avoid Using Reference Images Without Context
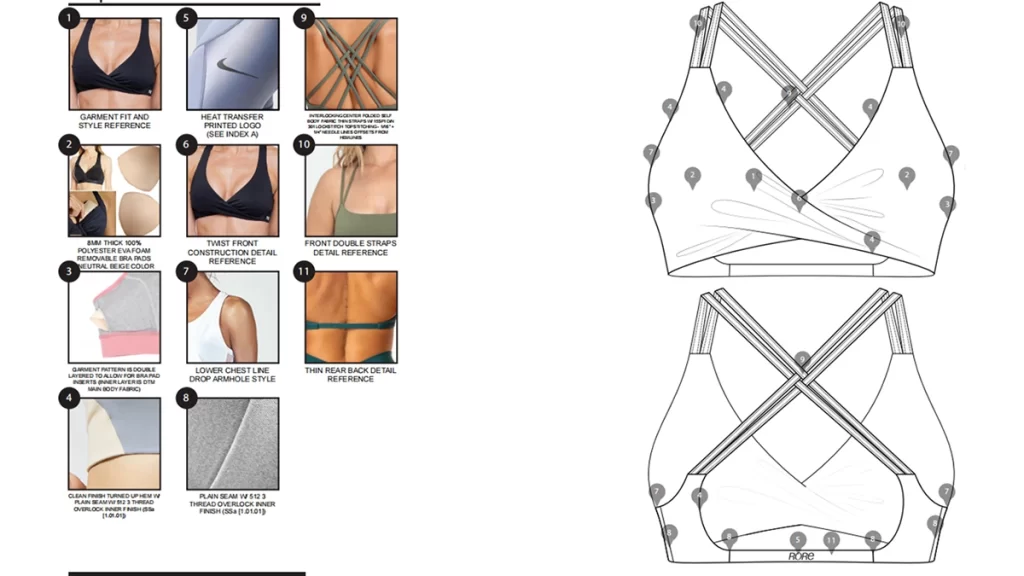
Several photos with no labels are a common reason a sample comes back wrong. Label each one. For example:
- Photo A is the fit
- Photo B is the fabric surface
- Photo C is the pocket
- Photo D is the color
A short PDF, a marked-up image, or a clear message is enough. The format matters less than knowing which photo owns which detail.
Existing Garments Can Be Useful References
A physical garment shows things a photo hides: real measurements, thickness, stretch, seam type, rib tension, hardware, wash and weight. Still say what to keep and what to change. A sample is a reference, not an instruction to copy every stitch.
2. Provide Measurements and Fit Information
Words such as oversized, relaxed, slim or compression point in a direction. They are not a pattern. One brand’s oversized tee is extra width. Another also wants a dropped shoulder, a longer sleeve and a shorter body.
If you have a size chart, send it with the sample size marked. Useful points depend on the style:
- Chest or bust
- Body length
- Shoulder
- Sleeve length
- Waist and hip
- Inseam, rise and leg opening
- Neck opening
- Hood size
- Waistband height
A hoodie, a sports bra, leggings and a boxy tee do not share one measurement list. Send the points that define that style.
If You Do Not Have a Complete Size Chart
You can still start. Ship a garment that fits the way you want, and note the changes. A clear note looks like this: “Use this tee for the body width. Drop the shoulder by 2 cm and keep the hem straight.”
That gives pattern making a base. Photos and a few body measurements can sit beside the garment for the first sample.
Fit Should Be Evaluated on the Actual Garment

Flat numbers do not show how the cloth behaves. Stretch, weight, drape, rib and seam placement change the fit on a body. Two pairs of leggings can measure the same and feel different if recovery or compression is different. A heavy tee can look more structured than a light one at almost the same spec.
Review fit on the sample, with the fabric and construction you intend to use.
Plan for Size Grading Before Bulk Production
After the sample size is approved, the other sizes are graded. Grading is not the same increment on every point. Chest, length, shoulder and sleeve can move by different amounts so the shape stays consistent.
That matters more on fitted activewear, extended sizes, and oversized or unusual proportions. Agree the grade before bulk cutting.

3. Specify Fabric Requirements
“100% cotton” or “nylon spandex” is a starting point, not a fabric. Weight, knit structure, yarn, finish, stretch and recovery can make two cloths with the same fiber list feel like different products.
A useful fabric note can include:
- Fiber content
- GSM or another weight
- Knit or woven structure
- Stretch direction, stretch and recovery
- Hand feel and surface
- Thickness
- Shrinkage
- Colorfastness and pilling
- Moisture management or other performance
- Wash, dye or finish
A heavy streetwear hoodie needs weight, body and wash behavior. Leggings need recovery, opacity and how the fabric feels in movement. Match the note to the garment.
Composition Alone Does Not Define the Fabric
Cotton jersey can be light and soft, or heavy and compact. Two nylon-spandex cloths can share a fiber ratio and still differ in compression, sheen and recovery. Describe the result you want, not only the fiber name.
A weak brief says “I need cotton.” A useful one says “a firm cotton fleece around 380 GSM for a washed oversized hoodie, with low shrinkage after the wash.”
Use Physical Swatches or Reference Garments When Possible

A swatch or a reference garment lets the team check hand feel, thickness, stretch, recovery, drape, surface, weight and finish. Those are hard to judge from a photo. From there we can look for a similar cloth in stock, or say if a custom fabric is needed.
Words such as soft, premium or buttery mean different things to different people. A swatch settles that.
Confirm Fabric Before Bulk Production
Write down the cloth used on the approved sample before bulk starts. A later lot that differs in weight, stretch, shrinkage or finish will change fit and appearance. Fabric approval is part of approving the garment.
4. Prepare Artwork in the Right Format
Logos, prints, embroidery and labels need a file the decoration team can scale. A screenshot can explain the idea. It is a poor file for production.
Send an original file when you have one:
- AI, EPS or SVG
- An editable PDF
- A high-resolution PNG
- A high-resolution PSD when the graphic needs layers
Vector artwork is the usual choice for logos and prints because it stays sharp when the size changes. Jnwear can print, embroider, wash and apply sequin embroidery once the file and the method are confirmed.
Vector Files Are Usually Better for Logos and Prints
A vector file is paths, not a fixed grid of pixels, so the edges stay clean when the mark is enlarged or reduced. AI, EPS, SVG and some PDFs are used for screen print, heat transfer, DTF, silicone, puff, labels, hangtags and packaging art.
Embroidery still starts from that artwork, then becomes a stitch file. If you only have a PNG or JPG, send the largest clean version. Avoid a compressed screenshot from a chat app.
Clearly Define Artwork Size and Placement
The file does not say where the mark sits. For each decoration, give:
- Size
- Placement
- Distance from a seam or the neckline
- Print, embroidery or other method
- Color
- Direction
- Whether the size or position changes by garment size
“Put the logo on the chest” leaves the sample team to choose. A measurable note is better: “Back graphic, 28 cm wide, centered 12 cm below the neck seam, DTF, single color.”
Check Whether the Artwork Is Suitable for the Selected Technique
Fine lines can disappear in embroidery. A large solid embroidery area can stiffen a light fabric. A photographic graphic often suits DTG or DTF better than a traditional screen print.
Before the sample, review line weight, complexity, color count, print area, fabric, stretch, surface and how the decoration should wash. Small artwork changes at this stage are cheaper than a redo after bulk.
5. Include Labels, Trims and Packaging Details
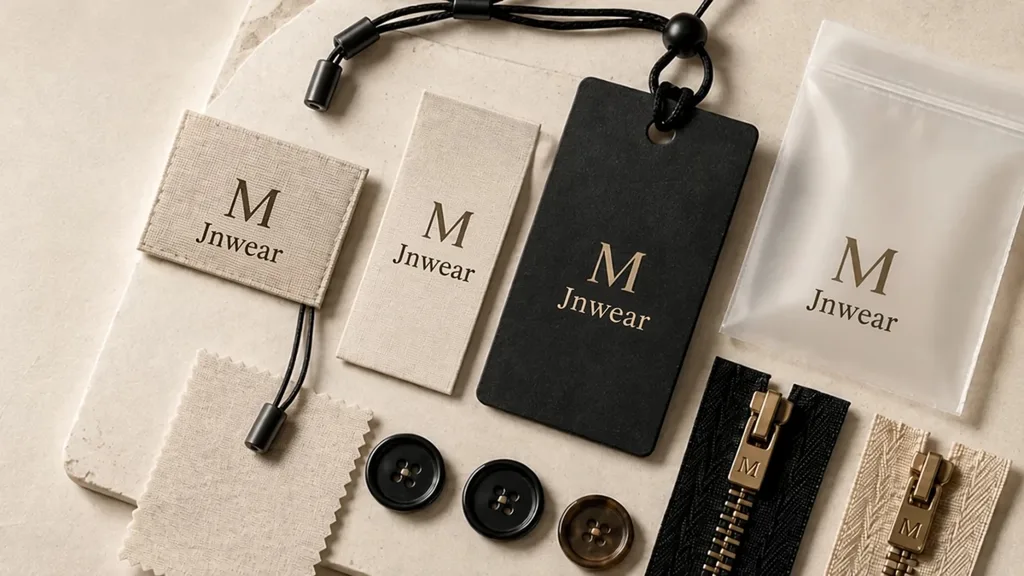
Labels, hardware and packaging affect the sample and the production plan. Add them while the style is still open, not after the sample is already approved.
Depending on the garment, that can include:
- Main label, size label and care label
- Hangtags
- Zippers, drawcords and eyelets
- Buttons or snaps
- Elastic and branded tape
- Custom packaging, polybags and stickers
- Carton marks
Each item can have its own art, material, size, color, minimum and lead time.
Prepare Label Artwork and Content Clearly
A main label needs the logo file. A care label also needs the words:
- Fiber content
- Wash instructions
- Size
- Country of origin
- Brand or maker line, if you use one
- Care symbols your market requires
Confirm wording, size and placement before labels are ordered in bulk. A wrong care label is difficult to fix once the roll is printed.
Trims Should Match the Garment Function and Design
A zipper is not only a look. It changes durability, comfort and cost. When you specify one, cover type, size, tape color, slider, puller, metal or plastic finish, and whether the hardware is branded.
The same applies to drawcords, eyelets, buttons and elastic. A photo, a physical sample or a supplier code is enough. If you do not have a trim yet, we can suggest options that fit the style and the target price.
Packaging Requirements Should Be Confirmed Before Bulk Production
Custom boxes, printed bags and hangtags need their own artwork and time. If packaging is branded, confirm:
- Polybag type and size
- Printed logo and any warning text
- Barcode and size stickers
- Tissue, boxes or mailers
- How the hangtag is attached
- Folding method
- Carton marks
Settling this before the garments are finished keeps packing from becoming a second project.
6. Share Quantity, Target Price and Timeline
Quantity, price and the ship date change which fabric and trims are realistic. A cloth that works at 1,000 pieces may miss the minimum on a 100-piece trial. A complex construction can be possible and still miss the budget or the launch.
At Jnwear, cut-and-sew programs can start from 50 pieces per design. Seamless styles start at 500 pieces per style, per color, per size. The final minimum still depends on the fabric and the customization.
Share Your Estimated Quantity by Style and Color
“500 pieces” is less useful than the split. A clear note looks like this: “120 hoodies: 60 black and 60 sand, sizes S–XL.” Or: “Two tees, 80 pieces each, two colors per tee.”
That split is what we use to check:
- Fabric and dye minimums
- Trim minimums
- Print or embroidery setup
- Size breakdown
- How the line will run
- A realistic unit price
The split matters more when the color is custom or the trim is special.
Should You Tell the Manufacturer Your Target Price?
A realistic target price helps. It tells us the level of cloth, trim and decoration to suggest. It is a guide for development, not a number the factory has to hit before the spec exists.
A tighter budget often points to stock fabric, standard trims, simpler construction and fewer decoration steps. A higher target can leave room for custom fabric, a special wash or more branding. Ask whether an early number is an estimate or a production price.
Include Your Target Launch Date
If the style is tied to a launch, a show or a season, send that date at the start. We can then see whether sampling and bulk fit.
A normal path includes design review, fabric, sampling, revisions, approval, materials, bulk, inspection, packing and shipping. At Jnwear, sampling usually takes about 7 working days after fabric, design and details are confirmed. Bulk production is usually 25–35 working days after sample approval. Custom cloth, wash, trims or extra sample rounds can add time.
What If You Don’t Have Complete Design Files?
You can still start. Many styles begin without a finished tech pack, a full size chart, a locked fabric spec or production-ready art. Send what you have, and mark the open items.
A first message can include:
- Reference photos
- Sketches or a mood board
- A garment you want to follow
- A few measurements
- Swatches
- A logo file
- Notes on fit, color, construction or branding
From that, we can say what else is needed before the first sample is cut.
Start With the Most Important Product Decisions
Early on, decide the items that move cost and construction:
- Product type
- Fit
- Fabric direction
- Main design details
- How the brand mark is applied
- Approximate quantity
- Target price, if you have one
- Launch date
You might already know you want a 400 GSM washed oversized hoodie with embroidery and a custom neck label, even if the grade and the zipper are not chosen. That is enough to start a useful discussion. Smaller details can be settled on the sample.
A Manufacturer Can Help Turn References Into Production Specifications
The brand knows the customer. The factory knows materials, construction and what the machines can repeat. Development works when both sides fill the gaps before bulk.
That support can cover fabric suggestions, pattern making, measurements, construction, decoration, trims, sampling, grading and a production plan. The aim is to replace guesses with a confirmed spec before the cloth is cut in bulk.
Final Checklist Before Sending Your Design to a Manufacturer
You do not need every line finished. A single brief still makes the first reply more useful:
- Sketch, reference photo or an existing garment
- Fit and silhouette
- Sample size and any measurements you have
- Fabric content or the performance you need
- Preferred weight
- Colors
- Logo and artwork files
- Print, embroidery or other decoration
- Labels, trims and packaging
- Quantity by style and color
- Size range
- Target price, if you have one
- Target ship date
- Any test or quality standard
If a line is unknown, mark it open. Guessing a number that you do not mean creates a sample nobody asked for.
Keep One Clear Approved Version
As details are confirmed, keep one current file. New measurements, art and photos sent in separate chats are easy to mix up. Update the tech pack or the approval note so both sides are looking at the same version, especially before bulk.
Final Thoughts
Preparing design files is not about sending the largest folder. It is about giving the factory enough to understand the garment, skip guesses, and sample the style you mean.
A full tech pack helps. A sketch, photos, a garment, swatches and a short list of requirements are also a valid start. Those notes should become a confirmed spec for fit, fabric, artwork, trims, packaging, quantity and timing before production.
Ready to Prepare Your Design for Production?
Send the product type, quantity, fabric notes and the references you have. Sampling at Jnwear usually takes about 7 working days after those details are confirmed. Bulk production is usually 25–35 working days after sample approval. Cut-and-sew MOQ starts at 50 pieces per design. Seamless MOQ is 500 pieces per style, per color, per size.
Reach the team through the contact page, WhatsApp +86 13332693486, or w1437s@gmail.com.
Common Questions
No. A tech pack helps, and development can also start from sketches, photos, a reference garment, a few measurements or fabric swatches. We will tell you which details still need a decision before the sample is cut.
Vector files such as AI, EPS, SVG or an editable PDF are the best default, because they stay sharp when resized. A high-resolution PNG or PSD can work for some print methods. Embroidery is converted from that artwork into a stitch file.
Yes. Say which parts of the photo to follow: fit, fabric, construction, wash or branding. Measurements or a physical garment make that sample more accurate.
It depends on the style. Common points are chest or bust, body length, shoulder, sleeve length, waist, hip, inseam, rise and leg opening. If you do not have a full chart, an existing garment can be the fit reference.
If the number is realistic, yes. It helps us suggest fabric, trims, construction and decoration that can fit the budget. Treat it as a guide until the specification is confirmed, not as a final production price.